Deployment and Testing
This lab is a little different form the others, it’s less of a step by-step guide and more of a informative piece. There are lot’s of factors in play when it come to getting your software in-front of people. This lab will cover some of the basics.
Get the Code
For this Lab you won’t need to write any C++ code. This is all provided for you on the Git Repo. Grab the code, add to CMake and load it up.
Notice how it’s only a quaint 43 lines of code. That’s how we know we’ve built a good engine. The game code only contains game logic.
Make sure it Runs
You should be able to run the code, the game will open and display the charterer moving around. Make sure this works before moving on.
Building For Release
Debug mode
So far we have been building and running code in the debug configuration. This allows us to stop and inspect the code whenever we like, and also identify the causes of crashes and exceptions. To enable this the compiler can’t change or optimise the code much, so we can correlate runtime behaviour with our lines of code.
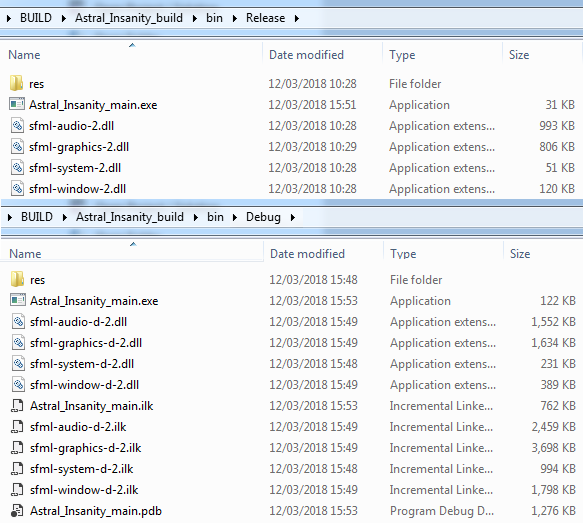
Additionally the compiler generates Debug symbols/Debug database files that allow the debugger to work. These files are quite large. See Figure
Build Configurations
To ship your game, you don’t want to give the debug build to people. You want to strip out the debugging junk and streamline the game code. This is called the “Release” build in Visual studio. Changing to this is Easy: See Figure
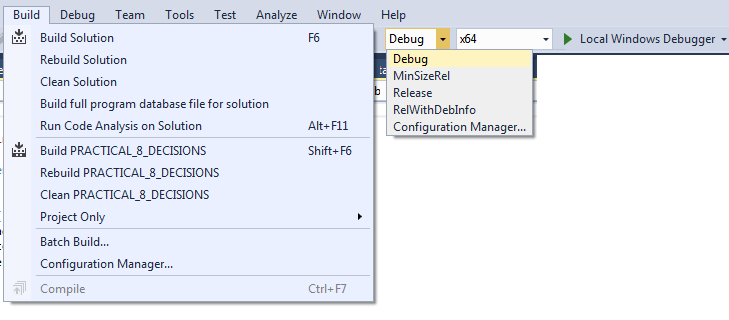
CMake has generated a solution with 4 configurations. Traditionally you may only ever get 2: Debug and Release.
The Additional ‘MinSizeRel’ instructs the compiler to make the executable as small as possible, and possibly sacrifice performance.
‘RelWithDebInfo’ instructs the compiler to optimise as much as it can, but still give us some debugging capability. This is useful but use with caution.
We have set CMake up to direct the output directory to be configuration dependant, so Building in Release will create a separate folder in the build folder. Take a look at the Contents: You can see that the debug files are missing form the release folder, and the files are considerably smaller. This is because the compiler has optimised our code and removed things we don’t need.
Running our Game
You should familiarise yourself with the output folder. This is were all our code gets compiled to. You should be able to run your game by clicking on the executable! When you click ‘Run’ in visual studio, this is the executable it’s runs.
Note that when you run from VS it may change some environment variables, such as the working Directory”, which is where your .exe will look for files. This can throw you off when it comes to debugging, usually VS set’s the working directory to be the Source folder, or the root of the build folder - Not Good.
This is covered in more detail here: Runtime Resources tips and tricks
We fixed this a long time ago with this line in CMake.
#set working directory to build dir
set_target_properties(${exe} PROPERTIES VS_DEBUGGER_WORKING_DIRECTORY
  ${CMAKE_RUNTIME_OUTPUT_DIRECTORY}/$(Configuration)
)
Now you know why we did that. So, anyway, that should mean that if you run the .exe yourself from the build folder, it should be the same as running from VS.
If you can’t run your .exe by clicking on it, or it crashes when you do: You must fix this, You can’t give a VS solution to people, they want a working .exe!
Back to build Configuration
CMake has handled all the of the VS grunt work for us, but it useful to understand the differences between the build configurations. For this we need to look at the project properties. The following figure shows how to get these up:
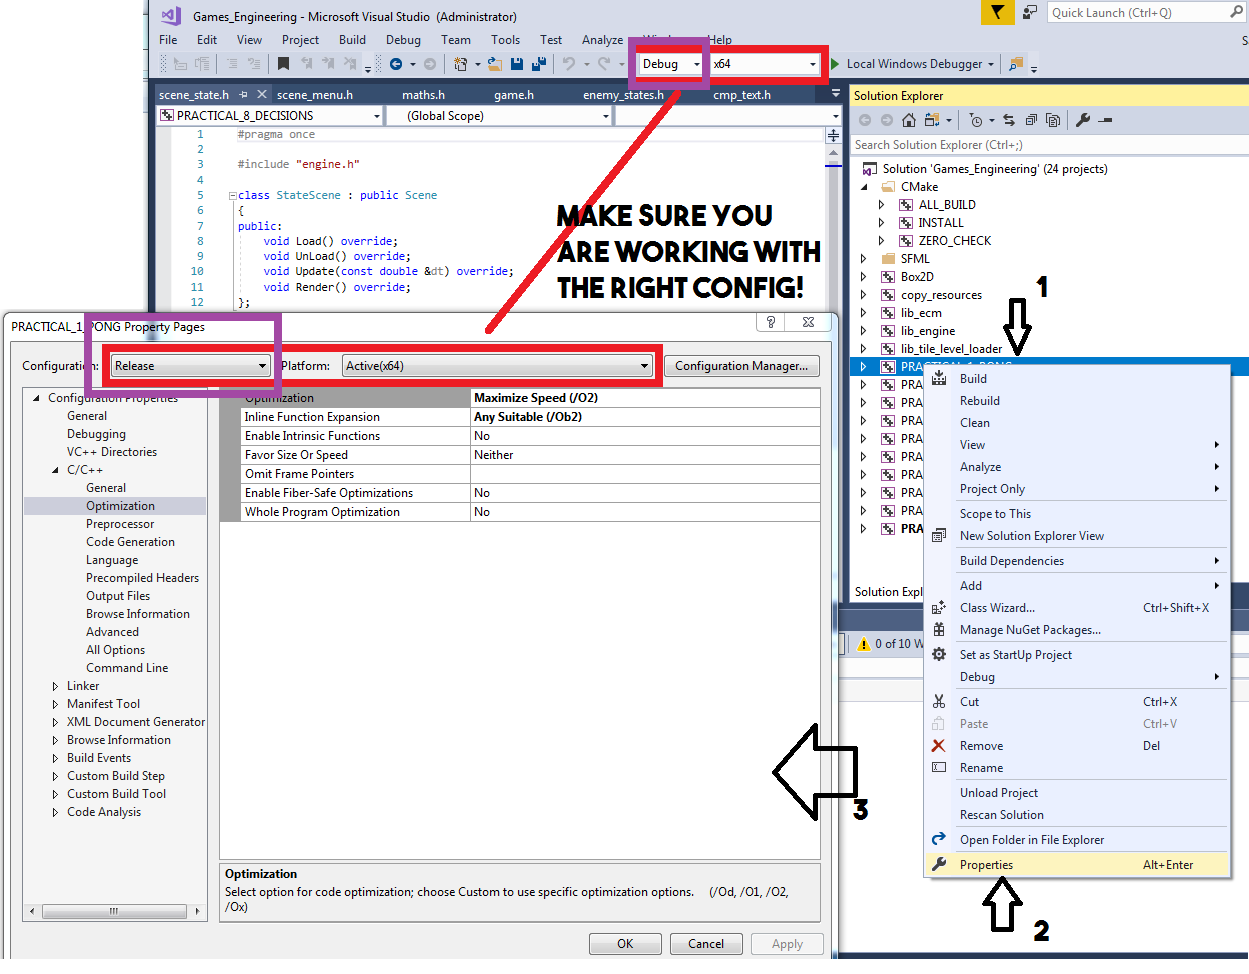
Two important points:
- Make sure you are viewing the correct configuration, the figure illustrates how you can easily be looking at release while you are building in debug.
- You should never need to change or alter anything in here, unless it’s a one-off test. CMake will override everything you do.
The project properties is usually where developers will spend hours configuring library and include settings. CMake has solved this for us. It is useful to peek in here however, mainly to verify that CMake is working properly.
From here you can poke through the various pages of settings to see what’s going on between the configurations. We don’t need to do anything in here, just have a look around.
Making An Installer
Assuming everything is fine so far. You have a working release build. This is what you need to get onto your users computers fo them to play your game.
Typically for them it will be “C:/Program Files/YourGame” rather than “C:/.../Build/Bin/Release/YourGame”.
You could totally just Zip up your release folder and FloppyDisk it to someone and there you go - Game Published. But as we’re not in the early 90’s, we tend to use better mediums of game distribution. Something like a Game Installer.
An installer can do a lot of complex things (i.e download content from the internet), but at there most basic function they do 4 things:
- Contain all your game files inside a single runnable .exe file - typically compressed.
- Show a dialogue wizard of some kind that let’s the user select an installation folder.
- Extract your game files to the selected folder.
- Optionally create desktop/Start Menu Shortcuts.
You could create an installer application yourself, but that’s a galactic-size kettle of fish. Most software projects make use of installer tool-chain of some kind. I would recommend either:
- NSIS (Nullsoft Scriptable Install System)
- Open Source and multi-platform, used by everyone.
- Inno Setup
- Easy to use, but not many features.
These both have their own scripting language that you will have to learn. Which is beyond the scope of coverage here. There is plenty of examples and documentations for you to able to work with either option.
Automating With CMake
THIS IS OPTIONAL ADVANCED STUFF
You can totally omit this and just hand-build your installer scripts, but if you want to become a CMake Wizard, read on:
CMake also supports building installer scripts for us. This saves you learning a new scripting language, the downside of this is that we have to get stuck into some advanced CMake tricks.
The following code and examples can be seen in action at this repo: [github.com/dooglz/Astral_Insanity](https://github.com/dooglz/Astral_Insanity
This is a minimum working best-practises example of a C++ SFML project. Some things are slightly different to how we’ve set-up the labs, but it should all make sense. I have set-up the CMake in the main repo to build an installer for the labs, but it has a lot of boilerplate in the way.
You can go look at either:
Astral_Insanity/master/CMakeLists.txt
or
The Section for generating the installer is at the end of the file. I don’t expect you to type it our yourself, feel free to copy it completely to your Coursework.
If you are interested in how this works, read on.
CPack
CPack is a component of CMake that supports building installers for various platforms. This makes sense as CMake already knows everything about your project and what/where it will compile to. It logically follows that CMake has all the information it needs to create an installer for you. Note that you still need to Install NSIS or anything else that Cpack supports. Cpack only creates the installer script and passes it to NSIS. If NSIS isn’t there it won’t work.
INSTALL Target
This is where things get confusing. CMake has “INSTALL” Targets. These specify a set of compiled Executable/library targets, and a destination to move them to once compiled. This is fundamentally different from an installer, and really has nothing to do with installer at all. This is mainly in the Linux Ecosystem where Installing Libraries to a shared /lib/ folder is common practise. We don’t want to do that.
PACKAGE Target
What we actually Want is the PACKAGE Target. This is CPack, and running it will generate the installer. How does CPack know what we want to add to the installer? It looks at the INSTALL targets, Confusing and backwards, I know. So even though we don’t want any install targets, we have to build them so CPack knows what to bring along. To stop the Install targets accidentally running, we change the INSTALL directory (CMAKE_INSTALL_PREFIX) to the a temp folder in build folder.