AI: Making Decisions
We have steering and movement in place, but that is really only a simple part of our AI behaviour. We are now going to look at how we can simplify decision making and behaviour management by implementing a state machine component and a decision tree component. These are both simple ideas, but take a bit of code to set-up. However, once in place you will be able to implement behaviours into your applications very rapidly.
Review – What is a State Machine?
We have mentioned states, state diagrams and state machines before. A state machine is just a technique for describing and modelling the state (behaviour, control, etc.) of a system in a mathematical manner. The system is modelled with a number of states, and the transitions between those states. As an example, we can model a game as a state machine such as this figure:
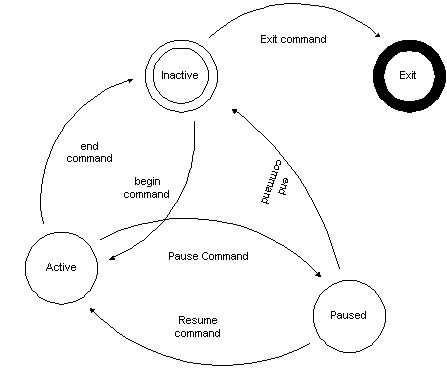
We have four states (active, inactive, paused, exit) and transitions between these states. Modelling our system in this manner makes it quite easy to understand. Let us look at a more concrete example.
State Machine Example
This is an example of a state machine for how a character might behave:
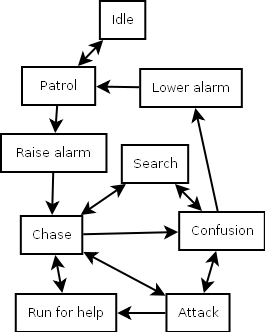
If you plot out how the behaviour works, starting from Idle at the top, you will see that this behaviour maps how an enemy guard might behave in a game. This is what we are aiming for in a state machine. It might be that you have no idea yet how to implement what Patrol means, but that doesn’t matter. At this level, you want to map high level behaviour, not low level implementation.
State Diagrams
We have already looked at state diagrams from a UML point of view, and state diagrams are useful in our games for this very reason. You should start becoming familiar with state diagrams from now on, and map applications in this manner (games or otherwise).
An example of a state diagram:
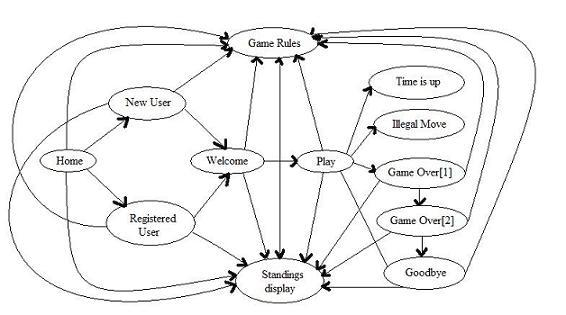
Individual states are mapped as ovals, and transitions between states are mapped using arrows between states. Again, we don’t worry about how we implement the individual states; we are simply identifying behaviours and worrying about implementing the low level behaviour later.
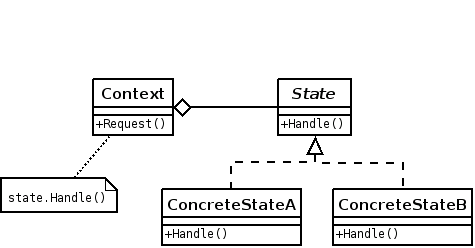
State Design Pattern
We have also already looked at the state design pattern. This is what we are going to implement in this lab.
As a reminder the state design pattern:
Building a State Machine System
We have now reviewed the general ideas that we are going to implement in this practical. Let us look at what our class diagram looks like in our engine.
Class Diagram
This illustrates the system we are going to implement:
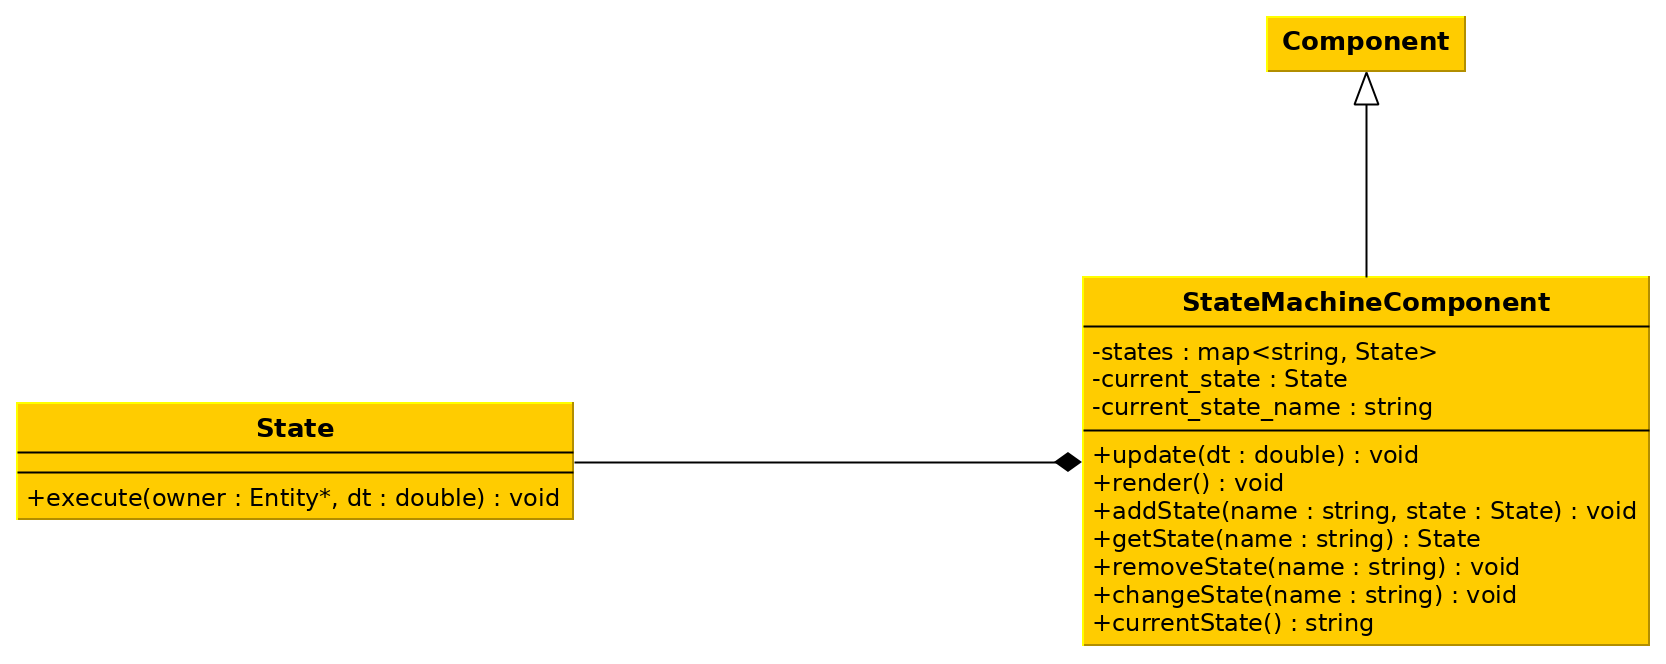
A State just has one method – execute. This method will process the behaviour of a given state.
The StateMachineComponent is where the management work happens. It combines ideas from the Component model, the state design pattern (obviously), and the manager pattern. A state machine will manage its states accordingly. All of its behaviour is actually quite simple. We can add states, remove states, change state, and update. The update will just call execute on the current state.
So with all this in hand, let us implement our state machine system and get a simple test example working.
Initial Setup
We need to do a little bit of set-up to get our system in place. You will need the components and steering behaviour code from last week for this lab. The point we are aiming for at the end of the lab is to combine steering, state, and decisions. So take everything you can from the last lab except for the scenes – we will implement new ones.
Updating CMakeLists.txt
As always we will need to update our CMakeLists.txt file. The new part is given below. It is the same as last week’s one more-or-less.
## 8 - Decisions
file(GLOB_RECURSE SOURCES practical_8_decisions/*.cpp practical_8_decisions/*.h)
file(GLOB_RECURSE CMPNTS practical_8_decisions/components/*.cpp practical_8_decisions/components/*.h)
file(GLOB_RECURSE SCENES practical_8_decisions/scenes/*.cpp practical_8_decisions/scenes/*.h)
add_executable(PRACTICAL_8_DECISIONS ${SOURCES} ${CMPNTS} ${SCENES} ${RESOURCE_FILES})
target_link_libraries(PRACTICAL_8_DECISIONS lib_engine)
set(EXECUTABLES ${EXECUTABLES} PRACTICAL_8_DECISIONS)
game.h Header
Our game.h header file is pretty much the same as last week as well. We will include our (yet-to-be-implemented) scene headers just for completeness. We will be defining them soon.
//"game.h"
#pragma once

#include "scenes/scene_menu.h"
#include "scenes/scene_state.h"
#include "scenes/scene_decision.h"

extern MenuScene menu;
extern StateScene stateScene;
extern DecisionScene decisionScene;
Creating Scenes
As you saw from the game.h header file we will have three scenes: a menu, a state scene, and a decision scene. Let us implement each of these in turn.
Menu Scene
The menu scene follows closely our last approach. The header and code file are given below.
//"scene_menu.h"
#pragma once

#include "engine.h"

class MenuScene : public Scene
{
public:
    MenuScene() = default;
    ~MenuScene() = default;

    void Load() override;

    void Update(const double &dt) override;
};
//"scene_menu.cpp"
#include "scene_menu.h"
#include "../components/cmp_text.h"
#include "../game.h"
#include <SFML/Window/Keyboard.hpp>
using namespace std;
using namespace sf;
void MenuScene::Load(){
auto txt = makeEntity();
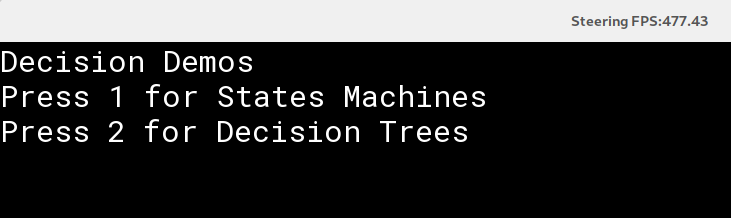
auto t = txt->addComponent<TextComponent>("Decision Demos\nPress 1 for States Machines\nPress 2 for Decision Trees");
setLoaded(true);
}
void MenuScene::Update(const double &dt){
if (sf::Keyboard::isKeyPressed(Keyboard::Num1)) {
Engine::ChangeScene(&stateScene);
} else if (sf::Keyboard::isKeyPressed(Keyboard::Num2)) {
Engine::ChangeScene(&decisionScene);
}
Scene::Update(dt);
}
State Machine Scene
We will provide a shell for the state scene at this point. The main part of the work comes in the Load method we will define later. The starting header and code files are below.
//"scene_state.h"
#pragma once

#include "engine.h"

class StateScene : public Scene
{
public:
    void Load() override;
    void UnLoad() override;
    void Update(const double &dt) override;
    void Render() override;
};
#include "scene_state.h"
#include "../components/cmp_sprite.h"
#include "../components/cmp_basic_movement.h"
#include <LevelSystem.h>

using namespace std;
using namespace std::chrono;
using namespace sf;

void StateScene::Load(){}

void StateScene::UnLoad(){
    Scene::UnLoad();
}

void StateScene::Update(const double &dt){
    Scene::Update(dt);
}

void StateScene::Render(){
    Scene::Render();
}
Decision Tree Scene
As with the state scene, the decision scene will just be a skeleton to start with. It is given in the following two code listings.
//scene_decision.h
#pragma once

#include "engine.h"

class DecisionScene : public Scene
{
public:
    void Load() override;
    void UnLoad() override;
    void Update(const double &dt) override;
    void Render() override;
};
//scene_decision.cpp
#include "scene_decision.h"
#include "../components/cmp_sprite.h"
#include "../components/cmp_basic_movement.h"
#include <LevelSystem.h>
#include <random>
#include <chrono>

using namespace std;
using namespace std::chrono;
using namespace sf;

void DecisionScene::Load(){}

void DecisionScene::UnLoad(){
    Scene::UnLoad();
}

void DecisionScene::Update(const double &dt){
    Scene::Update(dt);
}

void DecisionScene::Render(){
    Scene::Render();
}
Main File
And now we can implement our main file. This is given below. It is also simple.
//main.cpp
#include "engine.h"
#include "game.h"

using namespace std;

MenuScene menu;
StateScene stateScene;
DecisionScene decisionScene;

int main()
{
    Engine::Start(1280, 720, "Steering", &menu);
    return 0;
}
You should now be able to run the application to make sure it works. When you do, the menu should be presented as shown in this Figure:
State Machine Component
Let us now implement our new state machine system. We already know our class definitions for the header files – following this UML class diagram:
Header File
The header file is just the definition as given in the class diagram. The code is below.
//cmp_state_machine.h
#pragma once

#include <ecm.h>
#include <unordered_map>
#include <string>

class State
{
public:
    virtual ~State() = default;
    virtual void execute(Entity*, double) noexcept = 0;
};

class StateMachineComponent : public Component
{
private:
    std::unordered_map<std::string, std::shared_ptr<State>> _states;
    std::shared_ptr<State> _current_state;
    std::string _current_state_name = "";
public:
    void update(double) override;
    void render() override { }
    explicit StateMachineComponent(Entity *p);
    StateMachineComponent() = delete;
    void addState(const std::string&, std::shared_ptr<State>) noexcept;
    std::shared_ptr<State> getState(const std::string&) const noexcept;
    void removeState(const std::string&) noexcept;
    void changeState(const std::string&) noexcept;
    const std::string& currentState() const { return _current_state_name; }
};
You should (hopefully) be familiar with these ideas by now.
Implementation
The implementation of the state machine system is also easy. We need to implement the following:
- The constructor – it will be the same as previous components.
- The update method – will call execute on the current state.
- Add state – will add a value to the map.
- Get state – will retrieve a value from the map.
- Remove state – will remove a value from the map.
- Change state – will change the current state to the named state by retrieving it from the map. That is it. The implementation file is below and you should be able to understand the few lines of code we are using.
//cmp_state_machine.cpp
#include "cmp_state_machine.h"

using namespace std;

StateMachineComponent::StateMachineComponent(Entity *p) : _current_state(nullptr), Component(p) { }

void StateMachineComponent::update(double dt)
{
    if (_current_state != nullptr){
        _current_state->execute(_parent, dt);
    }
}

void StateMachineComponent::addState(const string &name, shared_ptr<State> state) noexcept
{
    _states[name] = state;
}

shared_ptr<State> StateMachineComponent::getState(const string &name) const noexcept
{
    auto found = _states.find(name);
    if (found != _states.end()) {
        return found->second;
    } else {
        return nullptr;
    }
}

void StateMachineComponent::removeState(const string &name) noexcept
{
    _states.erase(name);
}

void StateMachineComponent::changeState(const string &name) noexcept
{
    auto found = _states.find(name);
    if (found != _states.end()) {
        _current_state = found->second;
        _current_state_name = name;
    }
}
Testing the State Machine System
OK – implementing the state machine was easy. But is it easy to use? Yes it is. All we need to do is implement some states and add them to the state machine. Let us do that now.
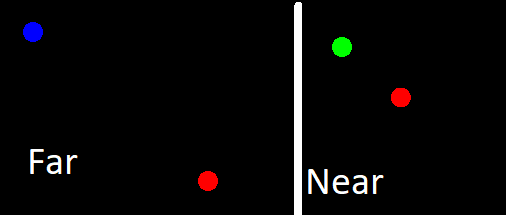
Enemy States
We are going to have a small enemy dot on the screen which will change colour based on how near the player is. We only need two states for this example – a normal state for when the player is far away; and a near state for when the player is within a certain distance. The declarations are given below.
//enemy_states.h
#pragma once

#include "components/cmp_state_machine.h"

class NormalState : public State
{
private:
    std::shared_ptr<Entity> _player;
public:
    NormalState(std::shared_ptr<Entity> player) : _player(player) { }
    void execute(Entity*, double) noexcept override;
};

class NearState : public State
{
private:
    std::shared_ptr<Entity> _player;
public:
    NearState(std::shared_ptr<Entity> player) : _player(player) { }
    void execute(Entity*, double) noexcept override;
};
To implement these we need to decide what happens in each state. Remember, these states are executed by the enemy each frame. So we need to ask ourselves – what is the behaviour we want the enemy to have at that frame. Let us make a decision:
- If the player is far away, we will set our colour to blue.
- We will then need to check if we should change state.
- If the player is near, we will set our colour to green.
- We will then need to check if we should change state.
This is surprisingly easy to do with the engine we have set-up so far. The implementation is below.
//enemy_states.cpp
#include "enemy_states.h"
#include "components/cmp_sprite.h"

using namespace sf;

void NormalState::execute(Entity *owner, double dt) noexcept {
    auto s = owner->get_components<ShapeComponent>();
    s[0]->getShape().setFillColor(Color::Blue);

    if (length(owner->getPosition() - _player->getPosition()) < 100.0f){
        auto sm = owner->get_components<StateMachineComponent>();
        sm[0]->changeState("near");
    }
}

void NearState::execute(Entity *owner, double dt) noexcept {
    auto s = owner->get_components<ShapeComponent>();
    s[0]->getShape().setFillColor(Color::Green);

    if (length(owner->getPosition() - _player->getPosition()) > 100.0f){
        auto sm = owner->get_components<StateMachineComponent>();
        sm[0]->changeState("normal");
    }
}
Completing State Machine Scene
OK, we have ourselves a state machine system, and we have some states. How do we use it? Well, we need to create an entity (“the enemy”) and attach a state machine component. We then use the component to add some states, and set our initial state. Sounds easy right? It is. The updated loading of the state scene is below.
//"Updated StateScene::Load
void StateScene::Load()
{
    auto player = makeEntity();
    player->setPosition(Vector2f(Engine::GetWindow().getSize().x / 2, Engine::GetWindow().getSize().y / 2));
    auto s = player->addComponent<ShapeComponent>();
    s->setShape<CircleShape>(10.0f);
    s->getShape().setFillColor(Color::Red);
    player->addComponent<BasicMovementComponent>();

    auto enemy = makeEntity();
    enemy->setPosition(Vector2f(50.0f, 50.0f));
    s = enemy->addComponent<ShapeComponent>();
    s->setShape<CircleShape>(10.0f);
    s->getShape().setFillColor(Color::Blue);

    auto sm = enemy->addComponent<StateMachineComponent>();
    sm->addState("normal", make_shared<NormalState>(player));
    sm->addState("near", make_shared<NearState>(player));
    sm->changeState("normal");
}
The new lines of code are 16-19. If you run the application you will be able to move your player to the enemy dot and see them change colour.