This lab is design to introduce you to: Object Orientation(OO) in C++, Working with C++ header files, and a small amount of memory and resource management.
Adding another project
We will be adding this lab a ‘project’ to our already existing ‘Games Engineering solution’.
Note: this is the vernacular of Visual studio. In CMake Terms we are adding another ‘Executable’ to the ‘project’.
-
Create a "practical_2" folder inside your repo.
-
Within that, create a main.cpp, feel free to copy some boilerplate SFML code into it.
- Add the following to your CMakeLists.txt
## Space invaders file(GLOB_RECURSE SOURCES 2_invaders/*.cpp 2_invaders/*.h) add_executable(2_INVADERS ${SOURCES} ) target_include_directories(2_INVADERS SYSTEM PRIVATE ${SFML_INCS}) target_link_libraries(2_INVADERS sfml-graphics) - Configure and generate from CMake.
Helpful hint: on Re-configuring CMake
Whenever we alter the CMake script, or add / remove source files from the source repo, we must configure and generate from CMake again. There is a short-cut do doing this. In your open solution in visual studio, CMake builds a helper project called "ZERO_CHECK". Building this project runs a script to configure and regenerate in the background. So we can edit and rebuild the CMakelists.txt without leaving Visual studio.
A note on creating additional files
As you know, we have all our source code in the source ‘repo’ folder, and all the project and build files in the ephemeral ‘build’ directory that CMake generates for us. CMake links the source files directly in the project files. When you edit a .cpp file in Visual Studio, it is editing the real file in the repo directory, even though all of visual studios files are in the ‘build’ directory.
One annoying caveat of this is that if you try to create a new file from visual studio, it incorrectly puts it in the build directory. You can manually type in the correct directory in the create file dialogue, or create the files manually and re-run CMake. Note: you will have to re-run CMake anyway when adding or removing files in the source directory.
Runtime Resources
We will be loading a bunch of files from disk, you need to make sure the resources are in the right place. Take a look here Runtime Resources tips and tricks
##Lib, linking, and cmake.
If you are getting into a mess with you CMake, have a look here CMake tips
Sprite-sheets
Before we get stuck in, you should have already have a standard boiler plate gameloop written to open a window and poll for events.
A common technique for 2D art assets in games is to combine what would be many separate images into one "sprite sheet". This saves time when loading in files, and a small amount of graphics memory. Images are places into tiles within a larger image, sprites are rendered by taking a ‘cut out’ of the larger image. In terms of optimisation this makes life very easy for the GPU – as it doesn’t have to switch texture units.
The primary benefit of sprite sheets however is sprite-animation. It is commonplace to have each tile in the sheet be the same square size. With this restriction in place, picking the dimensions to ‘cut’ are a simple multiplication operation. Rendering a sequence of frames as an animation is as simple as moving the ‘cut’ windows to the right each frame.
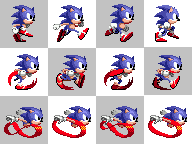

Animation Frames : Sonic will be rendered using different frames from the sprite-sheet each frame, looping to the start once all frame have been rendered. Creating the illusion of fluid movement

Our Space Invaders Sprite-sheet : It’s actually a transparent image - grey background just for clarity.
Save This image to your repo’s resoucres folder
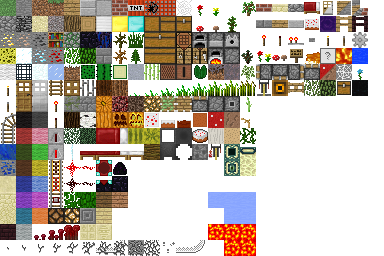
Minecraft’s Textures : Having all the textures in one image allows for easy mod-ability. The multiple squares of water and lava are animation frames.

UV Maps : Sprite sheets are not UV maps - Although visually similar - don’t confuse sprite-sheets for unwrapped UV textures. These are used to apply a texture to a 3d model. Sprite-sheets are for 2d sprites
Loading a sprite-sheet
Working with Sprite-sheets in SFML couldn’t be easier. Take a look at this:
//Main.cpp
sf::Texture spritesheet;
sf::Sprite invader;

void Load() {
  if (!spritesheet.loadFromFile("res/img/invaders_sheet.png")) {
    cerr << "Failed to load spritesheet!" << std::endl;
  }
  invader.setTexture(spritesheet);
  invader.setTextureRect(sf::IntRect(0, 0, 32, 32));
}

void Render() {
  window.draw(invader);
}
Totally easy. Take note of this line:
sprite.setTextureRect(sf::IntRect(0, 0, 32, 32));
The rectangle structure takes the form of (Left, Top, Width, Height). Our sprite-sheet is dived into squares of32x32 pixels. So this line of code set the ‘cut’ do be the top left square in the image, aka. The first invader sprite.
Note that the invader doesn’t take up the whole 32x32 square, it’s surrounded by transparent pixels. SFML takes care of doing the rendering with correct modes so as to cuts out the background, but we may have to be careful when it comes to physics and collision code.
Checkpoint
You should have a separate project setup and working, and showing this:
![]()
Don’t continue on untill you have this working
Previous step: Pong 3
Next step: Space Invaders 2